参考 Taskflow Handbook
快速使用
Taskflow 用 C++ 17 编写,使用 CMake 3.18 以上构建,所以请确保环境版本正确再进行后续操作。
下载
git clone https://github.com/taskflow/taskflow.git
编译
1
2
3
cd taskflow cmake -S . -B build cmake --build build
运行简单示例
1
2
cd build/examples ./simple
获得输出
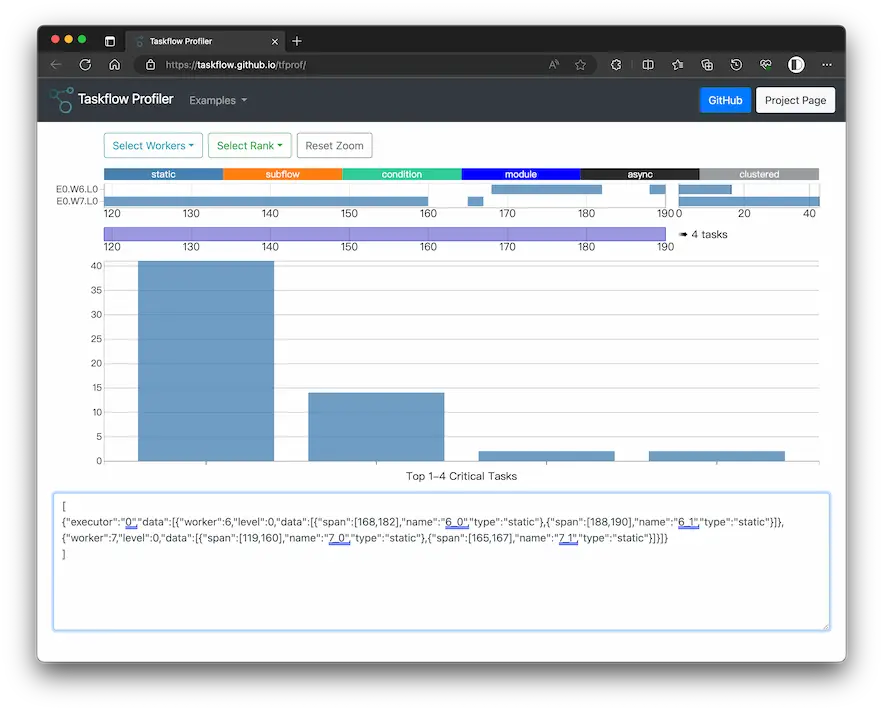
获得统计信息
1 2 TF_ENABLE_PROFILER=simple.json ./simple cat ./simple.json
获得输出
1 2 3 [ { "executor" : "0" , "data" : [ { "worker" : 6 , "level" : 0 , "data" : [ { "span" : [ 168 , 182 ] , "name" : "6_0" , "type" : "static" } , { "span" : [ 188 , 190 ] , "name" : "6_1" , "type" : "static" } ] } , { "worker" : 7 , "level" : 0 , "data" : [ { "span" : [ 119 , 160 ] , "name" : "7_0" , "type" : "static" } , { "span" : [ 165 , 167 ] , "name" : "7_1" , "type" : "static" } ] } ] } ]
将该段 json 文本复制到这个页面
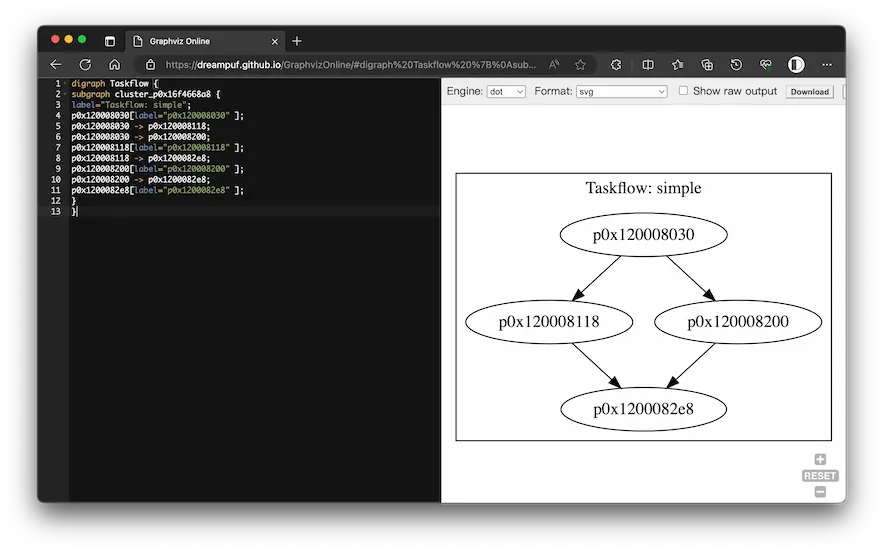
绘制依赖关系图
修改taskflow/examples/simple.cpp
1 2 3 4 5 6 7 ... taskflow.dump (std::cout); executor.run (taskflow).wait (); return 0 ;...
使用 CMake 构建,再运行可执行文件 simple,得到以下输出
1 2 3 4 5 6 7 8 9 10 11 12 13 14 15 16 17 TaskA TaskC TaskB TaskD digraph Taskflow { subgraph cluster_p0x16f4668a8 { label="Taskflow: simple"; p0x120008030[label="p0x120008030" ]; p0x120008030 -> p0x120008118; p0x120008030 -> p0x120008200; p0x120008118[label="p0x120008118" ]; p0x120008118 -> p0x1200082e8; p0x120008200[label="p0x120008200" ]; p0x120008200 -> p0x1200082e8; p0x1200082e8[label="p0x1200082e8" ]; } }
将绘图的代码复制到这个页面
集成Taskflow
由于 Taskflow 全部组织在头文件中,所以只需将taskflow/taskflow文件夹拷贝到自己的工程路径下,并确保编译器能够找到头文件。
建立工程
1 2 3 4 5 mkdir try_taskflow mkdir try_taskflow/third_party cp -r taskflow/taskflow/ try_taskflow/third_party/ cd try_taskflow/ code .
vscode 中,使用 cmd+shift+p 调出命令框,输入CMake,创建好 CMake工程(会自动创建出 cpp 文件)。
参照这篇文章配置好调试脚本:远程调试C++程序 - 配置vscode的launch.json和tasks.json
修改生成的 CMakeLists.txt,主要是修改 CMake 版本, C++ 标准版本以及 include 文件夹。
1 2 3 4 5 6 7 8 9 10 11 12 13 14 15 cmake_minimum_required (VERSION 3.18 )project (try_taskflow VERSION 0.1 .0 LANGUAGES C CXX)set (CMAKE_CXX_STANDARD 20 )include_directories (third_party/taskflow)include (CTest)enable_testing ()add_executable (try_taskflow main.cpp)set (CPACK_PROJECT_NAME ${PROJECT_NAME} )set (CPACK_PROJECT_VERSION ${PROJECT_VERSION} )include (CPack)
编写 main.cpp
1 2 3 4 5 6 7 8 9 10 11 12 13 14 15 16 17 18 19 20 21 22 23 24 25 26 27 28 29 30 #include <iostream> #include "taskflow.hpp" void myTask () "My Task!" << std::endl; }int main (int , char **) tf::Executor executor; tf::Taskflow taskflow; auto A = taskflow.emplace ([]() { std::cout << "Task A" << std::endl; }).name ("A" ); auto B = taskflow.emplace ([]() { std::cout << "Task B" << std::endl; }).name ("B" ); auto C = taskflow.emplace ([]() { std::cout << "Task C" << std::endl; }).name ("C" ); auto D = taskflow.emplace ([]() { std::cout << "Task D" << std::endl; }).name ("D" ); auto E = taskflow.emplace (myTask).name ("my task" ); A.precede (B, C); D.succeed (B, C); A.succeed (E); taskflow.dump (std::cout); executor.run (taskflow).wait (); return 0 ; }
运行结果
编译运行,获得输出
1 2 3 4 5 6 7 8 9 10 11 12 13 14 15 16 17 18 19 20 digraph Taskflow { subgraph cluster_p0x16fdfeca8 { label="Taskflow: p0x16fdfec48"; p0x108008030[label="A" ]; p0x108008030 -> p0x108008118; p0x108008030 -> p0x108008200; p0x108008118[label="B" ]; p0x108008118 -> p0x1080082e8; p0x108008200[label="C" ]; p0x108008200 -> p0x1080082e8; p0x1080082e8[label="D" ]; p0x1080083d0[label="my task" ]; p0x1080083d0 -> p0x108008030; } } My Task! Task A Task C Task B Task D
该代码对应生成的图像如下
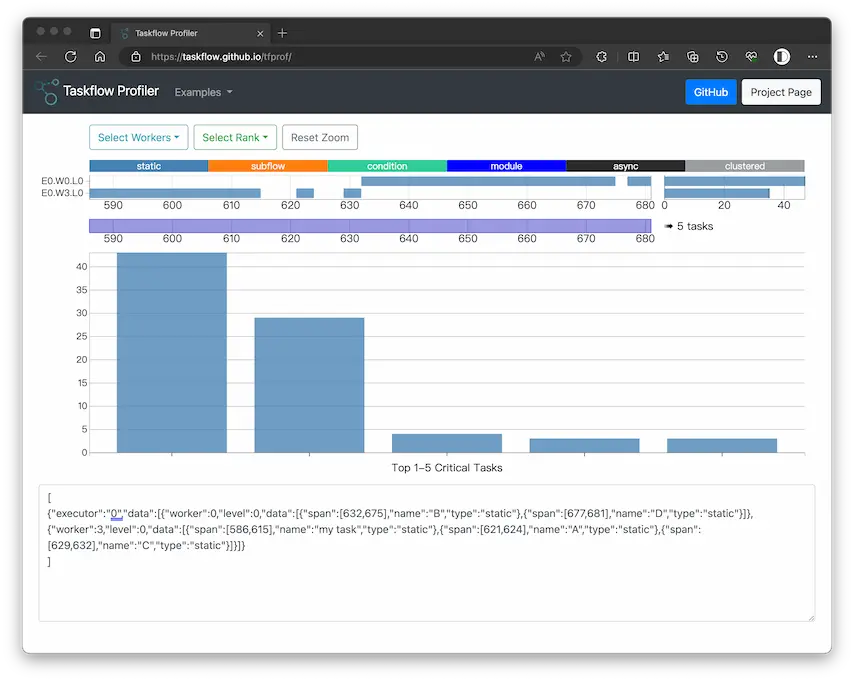
产生的统计信息如下
Taskflow机制
循环级并行:将迭代循环划分为一组块,如果循环中每个迭代中具有一定的独立性,就可以并行运行它们。
基于任务的并行性:有些应用更不规则,不能使用循环级并行,基于任务的模型可以完成更定制化的并行工作。
Task Dependency Graph
创建Task
只要是能让std::invoke作用的可调用对象,都可以使用tf::Taskflow创建任务。比如说函数、lambda表达式、绑定表达式或者重载了()运算符的类对象。
1 2 3 4 5 6 7 8 9 10 11 12 13 14 15 16 17 18 19 20 21 22 23 24 25 26 27 28 #include <iostream> #include "taskflow.hpp" void taskC () "task c" << std::endl; }class TaskD { public : void operator () () "task d" << std::endl; } }; int main (int , char **) tf::Taskflow taskflow; tf::Task A = taskflow.placeholder (); tf::Task B = taskflow.emplace ([]() { std::cout << "task b" << std::endl; }); tf::Task C = taskflow.emplace (taskC); TaskD taskD; tf::Task D = taskflow.emplace (taskD); auto [E, F, G] = taskflow.emplace ([]() { std::cout << "task e" << std::endl; }, []() { std::cout << "task f" << std::endl; }, []() { std::cout << "task g" << std::endl; }); taskflow.dump (std::cout); return 0 ; }
tf::Task
可以设置tf::Task的名称和任务,以及其在图中与其他 task 的关系
1 2 3 4 5 6 7 8 9 10 11 12 13 14 15 16 17 18 19 20 21 22 23 24 25 26 27 28 29 30 31 32 #include <iostream> #include "taskflow.hpp" int main () tf::Taskflow taskflow; std::vector<tf::Task> tasks = {taskflow.placeholder (), taskflow.placeholder ()}; for (int i = 0 ; i < 2 ; ++i) { tasks[i].name ("This is Task " + std::to_string (i)); } tasks[0 ].precede (tasks[1 ]); for (auto task : tasks) { std::cout << task.name () << ": " << "num_dependents=" << task.num_dependents () << ", " << "num_successors=" << task.num_successors () << std::endl; } taskflow.dump (std::cout); for (auto task : tasks) { task.work ([]() { std::cout << "got a new work!" << std::endl; }); } tf::Executor executor; executor.run (taskflow).wait (); return 0 ; }
输出
1 2 3 4 5 6 7 8 9 10 11 12 This is Task 0: num_dependents=0, num_successors=1 This is Task 1: num_dependents=1, num_successors=0 digraph Taskflow { subgraph cluster_p0x16fdfed00 { label="Taskflow: p0x16fdfeca0"; p0x108008030[label="This is Task 0" ]; p0x108008030 -> p0x108008118; p0x108008118[label="This is Task 1" ]; } } got a new work! got a new work!
有遍历前驱和后继节点的方法
1 2 3 4 5 6 7 8 9 my_task.for_each_successor([s=0 ] (tf::Task successor) mutable { std::cout << "successor " << s++ << '\n' ; }); my_task.for_each_dependent([d=0 ] (tf::Task dependent) mutable { std::cout << "dependent " << d++ << '\n' ; });
如果需要传参的时候,使用 data
1 2 3 4 5 6 7 int my_data = 5 ;tf::Task task = taskflow.placeholder (); task.data (&my_data) .work ([task](){ int my_date = *static_cast <int *>(task.data ()); std::cout << "my_data: " << my_data; });
Executor
使用tf::Executor类的对象来执行tf::Taskflow类的对象,可以复用。
可以指定使用的线程数:
1 2 3 tf::Executor executor1; tf::Executor executor2 (4 ) ;
run:执行一次。run_n:执行指定次数。run_until:运行直到某个条件成立。
需要使用wait_for_all或者wait来防止程序退出。如果一个 executor 上调用了多次run,那么这些run将按照调用顺序执行。
TODO: 一些特殊情况下的处理方式,例如可能出现死锁(corun的使用)、taskflow 的生命周期之类的。
Dynamic Tasking
有时候,某些任务是运行过程中动态创建的,这时候可以使用tf::Subflow来创建它们,并加入到tf::Taskflow中。
创建连接的动态任务
例如官方给的示例,并行计算斐波那契数列。
1 2 3 4 5 6 7 8 9 10 11 12 13 14 15 16 17 18 19 20 21 22 23 24 25 26 27 28 29 30 31 32 33 #include <iostream> #include "taskflow.hpp" int spawn (int n, tf::Subflow& sbf) if (n < 2 ) return n; int res1, res2; sbf.emplace ([&res1, n](tf::Subflow& sbf) { res1 = spawn (n - 1 , sbf); }) .name (std::to_string (n - 1 )); sbf.emplace ([&res2, n](tf::Subflow& sbf) { res2 = spawn (n - 2 , sbf); }) .name (std::to_string (n - 2 )); sbf.join (); return res1 + res2; } int main () int N = 5 ; int res; tf::Executor executor; tf::Taskflow taskflow ("fibonacci" ) ; taskflow.emplace ([&res, N](tf::Subflow& sbf) { res = spawn (N, sbf); }) .name (std::to_string (N)); executor.run (taskflow).wait (); taskflow.dump (std::cout); std::cout << "Fib[" << N << "]: " << res << std::endl; return 0 ; }
输出是
1 2 3 4 5 6 7 8 9 10 11 12 13 14 15 16 17 18 19 20 21 22 23 24 25 26 27 28 29 30 31 32 33 34 35 36 37 38 39 40 41 42 43 44 45 46 47 48 49 50 51 52 53 54 55 56 57 58 59 60 61 62 63 digraph Taskflow { subgraph cluster_p0x16fdfed00 { label="Taskflow: fibonacci"; p0x108008030[label="5" ]; subgraph cluster_p0x108008030 { label="Subflow: 5"; color=blue p0x110008030[label="4" ]; p0x110008030 -> p0x108008030; subgraph cluster_p0x110008030 { label="Subflow: 4"; color=blue p0x1100085a0[label="3" ]; p0x1100085a0 -> p0x110008030; subgraph cluster_p0x1100085a0 { label="Subflow: 3"; color=blue p0x110008940[label="2" ]; p0x110008940 -> p0x1100085a0; subgraph cluster_p0x110008940 { label="Subflow: 2"; color=blue p0x110008b10[label="1" ]; p0x110008b10 -> p0x110008940; p0x110008bf8[label="0" ]; p0x110008bf8 -> p0x110008940; } p0x110008a28[label="1" ]; p0x110008a28 -> p0x1100085a0; } p0x110008688[label="2" ]; p0x110008688 -> p0x110008030; subgraph cluster_p0x110008688 { label="Subflow: 2"; color=blue p0x110008770[label="1" ]; p0x110008770 -> p0x110008688; p0x110008858[label="0" ]; p0x110008858 -> p0x110008688; } } p0x110008118[label="3" ]; p0x110008118 -> p0x108008030; subgraph cluster_p0x110008118 { label="Subflow: 3"; color=blue p0x110008200[label="2" ]; p0x110008200 -> p0x110008118; subgraph cluster_p0x110008200 { label="Subflow: 2"; color=blue p0x1100083d0[label="1" ]; p0x1100083d0 -> p0x110008200; p0x1100084b8[label="0" ]; p0x1100084b8 -> p0x110008200; } p0x1100082e8[label="1" ]; p0x1100082e8 -> p0x110008118; } } } } Fib[5]: 5
图形如下
创建单独的动态任务
1 2 3 4 5 6 7 8 9 10 11 12 13 14 15 16 17 18 19 20 21 22 23 24 25 26 27 28 29 30 31 32 33 34 35 36 37 38 39 40 41 42 43 44 #include <iostream> #include "taskflow.hpp" int main (int , char **) tf::Taskflow taskflow; tf::Task A = taskflow.emplace ([]() { std::cout << "task a" << std::endl; }) .name ("A" ); tf::Task C = taskflow.emplace ([]() { std::cout << "task c" << std::endl; }) .name ("C" ); tf::Task D = taskflow.emplace ([]() { std::cout << "task d" << std::endl; }) .name ("D" ); tf::Task B = taskflow .emplace ([](tf::Subflow& subflow) { tf::Task B1 = subflow.emplace ([]() { std::cout << "task b1" << std::endl; }) .name ("B1" ); tf::Task B2 = subflow.emplace ([]() { std::cout << "task b2" << std::endl; }) .name ("B2" ); tf::Task B3 = subflow.emplace ([]() { std::cout << "task b3" << std::endl; }) .name ("B3" ); B1.precede (B3); B2.precede (B3); subflow.detach (); std::cout << "task b" << std::endl; }) .name ("B" ); A.precede (B); A.precede (C); B.precede (D); C.precede (D); tf::Executor executor; executor.run (taskflow).wait (); taskflow.dump (std::cout); return 0 ; }
输出是
1 2 3 4 5 6 7 8 9 10 11 12 13 14 15 16 17 18 19 20 21 22 23 24 25 task a task c task b task d task b2 task b1 task b3 digraph Taskflow { subgraph cluster_p0x16fdfed00 { label="Taskflow: p0x16fdfeca0"; p0x108008030[label="A" ]; p0x108008030 -> p0x1080082e8; p0x108008030 -> p0x108008118; p0x108008118[label="C" ]; p0x108008118 -> p0x108008200; p0x108008200[label="D" ]; p0x1080082e8[label="B" ]; p0x1080082e8 -> p0x108008200; p0x110008030[label="B1" ]; p0x110008030 -> p0x110008200; p0x110008118[label="B2" ]; p0x110008118 -> p0x110008200; p0x110008200[label="B3" ]; } }
对应的图是
嵌套和递归
TODO:
Conditional Tasking
Composable Tasking
Asynchronous Tasking
Asynchronous Tasking with Dependencies
Interact with the Runtime
Prioritized Tasking
GPU Tasking (cudaFlow)
GPU Tasking (cudaFlowCapurer)
Limit the Maximum Concurrency
Request Cancellation
Profile Taskflow Programs
一些典型场景
TODO:
Wavefront Parallelism
Fibonacci Number
Flip Coins
Graph Traversal
Matrix Multiplication
Matrix Multiplication (cudaFlow)
k-means Clustering
k-means Clustering (cudaFlow)
Text Processing Pipeline
Graph Processing Pipeline
Taskflow Processing Pipeline