准备工作
安装交叉编译环境
在X86的虚拟机上,为了编译出ARM64的镜像,需要安装ARM64的交叉编译环境
1
2
sudo apt-get install gcc-aarch64-linux-gnu sudo apt-get install libncurses5-dev build-essential git bison flex libssl-dev
制作根文件系统
继续使用busybox来制作根文件系统
1
2
3
wget https://busybox.net/downloads/busybox-1.33.1.tar.bz2 tar -xjf busybox-1.33.1.tar.bz2 cd busybox-1.33.1
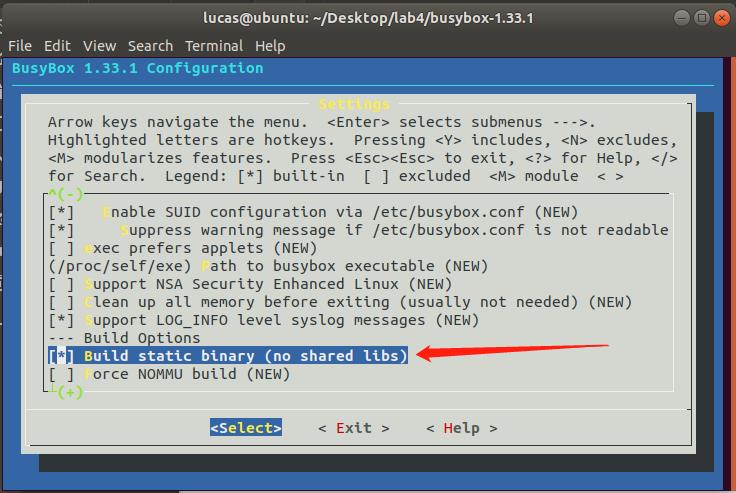
menuconfig中选择静态编译
使用交叉编译工具并编译
1
2
3
4
export ARCH=arm64 export CROSS_COMPILE=aarch64-linux-gnu- make make install
制作内存根镜像
1
2
cd _install mkdir etc dev lib
创建profile inittab fstab文件
1
2
3
4
5
6
7
cd etc touch profile vim profile touch inittab vim inittab touch fstab vim fstab
三个文件内容如下:
1
2
3
4
5
6
7
export HOSTNAME=bryant export USER=root export HOME=/home export PS1="[$USER@$HOSTNAME \W]\# " PATH=/bin:/sbin:/usr/bin:/usr/sbin LD_LIBRARY_PATH=/lib:/usr/lib:$LD_LIBRARY_PATH export PATH LD_LIBRARY_PATH
inittab
1
2
3
4
::sysinit:/etc/init.d/rcS ::respawn:-/bin/sh ::askfirst:-/bin/sh ::ctrlaltdel:/bin/umount -a -r
fstab
1
2
3
4
5
6
proc /proc proc defaults 0 0 tmpfs /tmp tmpfs defaults 0 0 sysfs /sys sysfs defaults 0 0 tmpfs /dev tmpfs defaults 0 0 debugfs /sys/kernel/debug debugfs defaults 0 0 kmod_mount /mnt 9p trans=virtio 0 0
创建init.d下的rcS文件
1
2
3
4
5
mkdir init.d cd init.d touch rcS vim rcS chmod 777 rcS
rcS
1
2
3
4
5
6
7
8
9
mkdir -p /sys mkdir -p /tmp mkdir -p /proc mkdir -p /mnt /bin/mount -a mkdir -p /dev/pts mount -t devpts devpts /dev/pts echo /sbin/mdev > /proc/sys/kernel/hotplug mdev -s
制作dev和lib目录中的内容
1
2
3
4
cd ../../dev sudo mknod console c 5 1 cd ../lib cp /usr/aarch64-linux-gnu/lib/*.so* -a .
配置、编译内核
下载内核源代码
1
2
3
4
5
6
sudo apt install axel axel -n 20 https://mirrors.edge.kernel.org/pub/linux/kernel/v5.x/linux-5.4.34.tar.xz xz -d linux-5.4.34.tar.xz tar -xvf linux-5.4.34.tar cd linux-5.4.34/
生成.config
1 make defconfig ARCH=arm64
在.config中加入如下内容
1
2
3
4
CONFIG_DEBUG_INFO=y CONFIG_INITRAMFS_SOURCE="./root" CONFIG_INITRAMFS_ROOT_UID=0 CONFIG_INITRAMFS_ROOT_GID=0
编译
1
2
sudo cp -r ../busybox-1.33.1/_install root make ARCH=arm64 Image -j8 CROSS_COMPILE=aarch64-linux-gnu-
安装qemu
1
2
3
4
5
6
7
8
cd .. apt-get install build-essential zlib1g-dev pkg-config libglib2.0-dev binutils-dev libboost-all-dev autoconf libtool libssl-dev libpixman-1-dev libpython-dev python-pip python-capstone virtualenv wget https://download.qemu.org/qemu-4.2.1.tar.xz tar xvJf qemu-4.2.1.tar.xz cd qemu-4.2.1 ./configure --target-list=x86_64-softmmu,x86_64-linux-user,arm-softmmu,arm-linux-user,aarch64-softmmu,aarch64-linux-user --enable-kvm make sudo make install
启动linux内核
1
2
cd linux-5.4.34 /usr/local/bin/qemu-system-aarch64 -m 512M -smp 4 -cpu cortex-a57 -machine virt -kernel arch/arm64/boot/Image -append "rdinit=/linuxrc nokaslr console=ttyAMA0 loglevel=8" -nographic -s
配置VSCode使用VSCode调试Linux内核
编写代码
新建test.c
1
2
3
cd .. touch test.c vim test.c
test.c
1 2 3 4 5 6 7 8 9 10 11 12 13 14 15 16 17 18 19 20 21 22 23 24 25 26 27 28 29 30 #include <stdio.h> #include <time.h> #include <sys/time.h> int main () { time_t tt; struct timeval tv ; struct tm *t ; #if 0 gettimeofday(&tv,NULL ); #else asm volatile ( "add x0, x29, 16\n\t" "mov x1, #0x0\n\t" "mov x8, #0xa9\n\t" "svc #0x0\n\t" ) ;#endif tt = tv.tv_sec; t = localtime(&tt); printf ("time: %d/%d/%d %d:%d:%d\n" , t->tm_year + 1900 , t->tm_mon, t->tm_mday, t->tm_hour, t->tm_min, t->tm_sec); return 0 ; }
编译,并放到root文件夹中,并重新编译内核
1
2
3
4
aarch64-linux-gnu-gcc -o test test.c -static sudo cp test linux-5.4.34/root/ cd linux-5.4.34 make ARCH=arm64 Image -j8 CROSS_COMPILE=aarch64-linux-gnu-
进行调试
运行VSCode
修改launch.json和tasks.json
1
2
3
4
5
6
7
8
9
10
11
12
13
14
15
16
17
18
19
20
21
22
23
24
25
26
27
28
29
30
31
32
33
34
35
36
37
38
39
40
{ "version" : "0.2.0" , "configurations" : [ { "name" : "(gdb) linux" , "type" : "cppdbg" , "request" : "launch" , "preLaunchTask" : "vm" , "program" : "${workspaceRoot}/linux-5.4.34/vmlinux" , "miDebuggerPath" : "/usr/bin/gdb-multiarch" , "miDebuggerServerAddress" : "localhost:1234" , "args" : [ ] , "stopAtEntry" : true , "cwd" : "${workspaceFolder}" , "environment" : [ ] , "externalConsole" : false , "MIMode" : "gdb" , "miDebuggerArgs" : "-n" , "targetArchitecture" : "x64" , "setupCommands" : [ { "text" : "dir ." , "ignoreFailures" : false } , { "text" : "add-auto-load-safe-path ./" , "ignoreFailures" : false } , { "text" : "-enable-pretty-printing" , "ignoreFailures" : true } ] } ] }
1
2
3
4
5
6
7
8
9
10
11
12
13
14
15
16
17
18
19
20
21
22
23
24
25
26
27
28
29
30
31
32
33
34
35
36
37
38
39
40
41
42
43
44
45
46
47
48
49
{ "version" : "2.0.0" , "tasks" : [ { "label" : "vm" , "type" : "shell" , "command" : "/usr/local/bin/qemu-system-aarch64 -m 512M -smp 4 -cpu cortex-a57 -machine virt -kernel arch/arm64/boot/Image -append \"rdinit=/linuxrc nokaslr console=ttyAMA0 loglevel=8\" -nographic -s" , "presentation" : { "echo" : true , "clear" : true , "group" : "vm" } , "isBackground" : true , "problemMatcher" : [ { "pattern" : [ { "regexp" : "." , "file" : 1 , "location" : 2 , "message" : 3 } ] , "background" : { "activeOnStart" : true , "beginsPattern" : "." , "endsPattern" : "." , } } ] } , { "label" : "build linux" , "type" : "shell" , "command" : "make" , "group" : { "kind" : "build" , "isDefault" : true } , "presentation" : { "echo" : false , "group" : "build" } } ] }
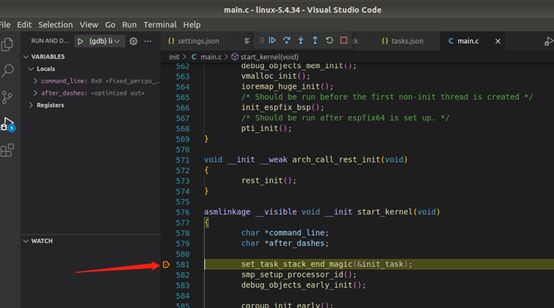
添加断点
F5启动调试
el0_sync 处的内核汇编代码首先做的就是保存异常发生时程序的执行现场,然后根据异常发生的原因跳转到 el0_svc,el0_svc 会调用 el0_svc_handler、el0_svc_common 函数,将 X8 寄存器中存放的系统调用号传递给 invoke_syscall 函数。
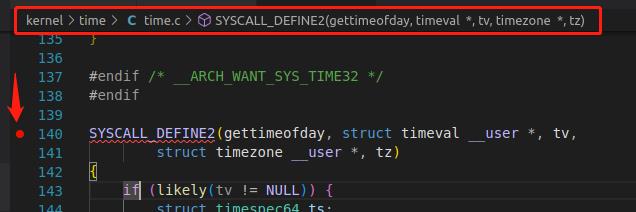
接着执行 invoke_syscall 函数,将通用寄存器中的内容传入 syscall_fn(),引出系统调用内核处理函数 __arm64_sys_gettimeofday。
系统调用内核处理函数执行完成后,会将系统调用的返回值存放在 X0 寄存器中。
系统调用返回前,需要恢复异常发生时程序的执行现场(恢复现场),其中就包括恢复 ELR_EL1 和 SPSR_EL1 的值(原因是异常会发生嵌套,一旦发生异常嵌套 ELR_EL1 和 SPSR_EL1 的值就会随之发生改变)。最后内核调用异常返回指令 eret,CPU 硬件把 ELR_EL1 写回 PC,把 SPSR_EL1 写回 PSTATE,返回用户态继续执行用户态程序。如下图所示,该部分操作由 ret_to_user 函数中的 kernel_exit 0 完成。